
This is the fourth part of my ANTLR Tutorial. Previous issues, Part I, Part II and Part III are also available. Before you ask, I have no idea how many parts this tutorial will have. I will keep sharing some knowledge, both from ANTLR and C#. I hope you keep enjoying it and that it is useful for anyone.
This part will result in implementing the basic drawing and movement commands available in LOGO. Note that we will be required to rewrite some portions of the code we wrote before. This is on purpose. At the beginning of this project, I decided to share the development process. And, this is it. We often need to rewrite parts of our code.
In this part, we will:
- Adapt the
Command.csclass, to support different numbers and types of arguments, as some commands have more than one parameter, and receive other types of parameters, like points. - Change the grammar to case insensitive and support more commands and data types (real values and points).
- Add support for arcs in our SVG implementation (it will get hairy). Before I forget to give credit, the implementation is based on this code from Stack Overflow.
⚠️ Update 1: My mistake, I interpreted that the setxy command and other similar set commands moved the turtle without drawing the line from the previous position to the new one. These commands should work similarly to forward and back. Instead of updating the behaviour in this part of the tutorial, I will update that in Part VIII, which I am currently writing. [13 December 2023]
⚠️ Update 2: Copy & paste is evil. In my code to create the line when the turtle goes backwards I forgot to change the signal on the X-axis. Fixed below and the fixed code will show up in the GIT after part X of the tutorial. [10 February 2024]
Different Command Parameters
Currently, our commands have a single parameter, which is an integer. We will need to support commands that have no parameters (like home), support real values, and support commands that have point coordinates as parameters (like setxy), and commands that have multiple parameters (like arc).
To accomplish this, the command will have a list of parameters, instead of a single one. We will define an interface to represent parameters and define some implementations, like a value parameter and a point.
The parameter interface will be called IParameter.cs and will implement the INode interface. It will not add any explicit new method for now. We will need those later when we deal with expressions.
namespace Logo2Svg.AST;

public interface IParameter : INode
{
}For the parameter of type real, we will create a ValueParam.cs class. It stores a float value. As it implements the IParameter interface, we need to declare the Execute method. Nevertheless, it does not make sense to execute a parameter, and therefore it will throw an exception. Finally, the ToString method just returns a textual representation of the value.
using System.Globalization;

namespace Logo2Svg.AST;

public class ValueParam : IParameter
{
    public readonly float Value;

    public ValueParam(float value) => Value = value;

    public void Execute(Turtle turtle) =>  throw new NotImplementedException();

    public override string ToString() => Value.ToString(CultureInfo.InvariantCulture);
}Regarding the parameter of the type point, we will create the PointParam.cs class. It is similar to the above one but stores two coordinate values. We are reusing the ValueParam class to store the values, as that will be useful later when we get expressions supported in the language.
namespace Logo2Svg.AST;

public class PointParam : IParameter
{
    public ValueParam X { get; }
    public ValueParam Y { get; }

    public PointParam(ValueParam x, ValueParam y)
    {
        X = x;
        Y = y;
    }

    public void Execute(Turtle turtle) => throw new NotImplementedException();

    public override string ToString() => $"({X},{Y})";
}Now we can edit the Command.cs to support the parameter list. First, remove the Value field, and add a Params field, which is a list of IParameter elements. Also, we updated the constructor to handle this list of values and the stringification method.
    public List<IParameter> Params;

    public Command(int id, string command, params IParameter[] @params)
    {
        Id = id;
        Name = command;
        Params = @params is null ? null : new List<IParameter>(@params);
    }

    public override string ToString()
    {
        var parameters = Params is null ? "" : string.Join(",", Params);
        return $"{Name}({parameters})";
}It will be handy to get the value of a parameter as a value or a point. To help that process, we will create a parameter accessor. It will be a generic type method, that receives the type we are requesting.
    private T Parameter<T>(int i)
    {
        if (i < 0 || i >= Params.Count)
            throw new IndexOutOfRangeException("Parameter out of bounds");
        if (Params[i] is not T p)
            throw new InvalidCastException("Invalid parameter type");
        return p;
}We specify the position of the parameter we desire and, if it exists, and has the correct type, we return the element after the proper cast.
The method Execute needs to be updated too, to gather the parameter value from the parameters list.
    public void Execute(Turtle turtle)
    {
        switch (Id)
        {
            case LogoLexer.Forward:
            {
                var value = Parameter<ValueParam>(0).Value;
                var pos = turtle.Position;
                var target = new Point(pos.X + MathF.Cos(turtle.Rotation) * value,
                                       pos.Y - MathF.Sin(turtle.Rotation) * value);
                turtle.AddLine(pos, target);
                turtle.Position = target;
                break;
            }
            case LogoLexer.Right:
            {
                var value = Parameter<ValueParam>(0).Value;
                turtle.Rotation -= value * Turtle.ToRadians;
                break;
            }
            default:
                throw new Exception($"Unknown command: {Id}-{Name}");
        }
}To conclude this section, the arguments must be created as a list when the Command constructor is called. We will need to change this code shortly. Thus, to keep us from rewriting a long amount of code, for now, we will edit only one line, the return statement of the method VisitCommand.
return command != null ?
    new Command(id, command, new []{ new ValueParam(float.Parse(value)) }) : null;
This first section changes are complete, and the code should compile again without any errors and still behave like before.
Grammar Changes
As pointed out in the introduction of this article, LOGO is case insensitive. The usual way to do this in ANTLR is to create fragments (rules in the lexer that work just as macros, as no terminal symbols are generated for them), one for each letter of the alphabet. They look like this:
fragment A : [Aa] ;
fragment B : [Bb] ;
fragment C : [Cc] ;This will be done for the 26 letters and will be added at the bottom of the file, where it does not hinder the legibility. I will not share here the code for all the letters. Please do them yourself, or check out the file from the GIT repository.
To allow the Forward and Right commands to be case insensitive, rewrite them as follows:
Right   : R I G H T | R T ;
Forward : F O R W A R D | F D ;It’s not as legible as before, but not that bad. We will add the new commands as well:
Arc     : A R C ;
Home    : H O M E ;
Back    : B A C K | B K ;
Left    : L E F T | L T ;
SetX    : S E T X ;
SetY    : S E T Y ;
SetXY   : S E T X Y ;
SetPos  : S E T P O S ;
SetH : S E T H ( E A D I N G )? ;Regarding the semantics of each command, read below, when we implement each of them. In any case, do not forget you can read the reference and test the commands online.
At the moment we only support integer values. When we are dealing with trigonometry decimal values are relevant. We are supporting them in two different lexer rules, and then allow the definition of a Value symbol in the grammar. The lexer rules for these two terminal symbols are:
IntegerValue   : [0-9]+ ;
RealValue : [0-9]* '.' [0-9]+ ;For the lexer, these rules will be enough. For the grammar, we will do a lot of refactoring to accommodate the new commands and their possible different number and types of parameters. This time I will prefer to share the complete grammar and explain each change afterwards.
program : command+ EOF
        ;

command : simpleCommand
        | SetPos squarePoint
        | SetXY simplePoint
        | Home
        | Arc value value
        ;

simpleCommand : cmd=(Right|Left|Forward|Back|SetX|SetY|SetH) value ;

simplePoint : value value
            ;

squarePoint : '[' value value ']'
            ;

value : IntegerValue
      | RealValue
;Let us dive into the grammar, one rule at a time:
- The program rule is, still, a list of one or more commands;
- Commands can vary in terms of the number of parameters and their type. For that reason, to simplify our visitors, the commands with only one parameter were put into evidence in their own rule. Thus, the command rule is either a simple command (one with a single parameter) or the commands that follow:
SetPos,SetXY,HomeandArc. Note that the first one receives a parameter of thesquarePointtype, the second a parameter of thesimplePointtype, the third does not have any parameter, and the last one has two value parameters. We’ll explain what each type of parameter is shortly. - A simple command is, therefore, a command with only one parameter. Instead of creating a rule with multiple alternatives, this time I decided to group the commands in a single one. This will simplify our code. There is a new syntax there. The
cmd=(...)portion. This allows the creation of a named group, and to specify that any one of the terminal symbols in the list will be accessible using thecmdidentifier. This will become easier to understand when we write the code to handle this rule. - A simple point will specify a point in the cartesian plane, therefore, a pair of values.
- The other kind of point is similar to the previous one, but its syntax differs. Instead of having just the two values, a pair of square brackets is needed. Compare these two different syntax alternatives to understand better:
SetXY 10 20andSetPos [ 10 20 ]. - Finally, a value is either an integer value or a real value. Nothing fancy here.
Creating the Visitors
I will divide the remaining code into two parts. First, we will create the code to create the abstract syntax tree (thus, the visitors). Second, in the next section, we will create the code required to execute the recognized commands properly.
When writing visitors it is often easier to start with the lower parts of the parsing tree, and then climb the tree up to the root. Yes, that is correct, in computer science trees have the root at the top.
In our grammar, this means we will start with the rules for value, then the two types of coordinates, following the simple command and, finally the top rule for all different command types.
    public override INode VisitValue([NotNull] LogoParser.ValueContext context)
    {
        var valueStr = (context.IntegerValue() ?? context.RealValue()).Symbol.Text;
        return new ValueParam(float.Parse(valueStr));
}A value is either an integer or a real value. We start by checking if we have IntegerValue or RealValue context. Then, we access the symbol’s type. Note the usage of the ?? operator. We can do that as the return type for both methods is the same: ITerminal. We then use the Parse method to convert the string and create the parameter object.
    public override INode VisitSquarePoint(LogoParser.SquarePointContext context)
    {
        var xVal = Visit<ValueParam>(context.value(0));
        var yVal = Visit<ValueParam>(context.value(1));
        return new PointParam(xVal, yVal);
    }

    public override INode VisitSimplePoint([NotNull] LogoParser.SimplePointContext context)
    {
        var xVal = Visit<ValueParam>(context.value(0));
        var yVal = Visit<ValueParam>(context.value(1));
        return new PointParam(xVal, yVal);
}These two are very similar, as they both create points. The main difference is that the context has a different type not allowing us to merge them. The code is simple: obtain each value and create a point. Note that this is the first time we use the context accessor as a method. This happens because, in the rule for point, the symbol value appears twice. The integer is just the position of the symbol we are accessing.
public override INode VisitSimpleCommand([NotNull] LogoParser.SimpleCommandContext context)
{
    var @param = Visit<ValueParam>(context.value());
    var command = context.cmd.Type;
    var name = context.cmd.Text;
    return new Command(command, name, @param);
}In this visitor, the only novelty is the usage of the cmd accessor which was defined in the grammar as being a list of possible commands with a single parameter. We get the identifier of the rule and its name, and supply them to the command’s constructor, together with the list of (a single) parameters.
public override INode VisitCommand(LogoParser.CommandContext context)
{
  IToken command = null;
  List<IParameter> parameters = new();

  if (context.simpleCommand() is { } splCmd)
  {
      return Visit<Command>(splCmd);
  }

  if (context.Home() is { } homeCtx)
  {
      command = homeCtx.Symbol;
  }

  if (context.SetXY() is { } setXyCtx)
  {
      command = setXyCtx.Symbol;
      parameters.Add(Visit<IParameter>(context.simplePoint()));
  }

  if (context.SetPos() is { } setPosCtx)
  {
      command = setPosCtx.Symbol;
      parameters.Add(Visit<IParameter>(context.squarePoint()));
  }

  if (context.Arc() is { } argCtx)
  {
      command = argCtx.Symbol;
      parameters.AddRange(context.value().Select(Visit<IParameter>));
  }

  return command is not null ?
       new Command(command.Type, command.Text, parameters.ToArray()) : null;
}This one is long but repetitive. I tried to get a more elegant solution but failed miserably. I even tried to use reflection, but what I saved in size I lost in legibility and maintainability. So, this is the best I could get.
We go one alternative at a time, trying to guess which was recognized. When we find it, we save the command token, to use during the command creation. We also store the parameters in a list.
Producing SVG
In the last part of this tutorial, I mentioned that we would only need lines. Nevertheless, I forgot the arc command. Thus, we will need to allow our canvas to have other things rather than lines. Using the same approach we have been using in similar situations, we will define an Interface for drawable elements. But this interface will have no methods, as the code will rely only on the existence of the stringification method.
namespace Logo2Svg.SVG;
public interface IDrawable
{
}The Line class will also be implementing the IDrawable interface:
public class Line : IDrawable
{
// [...]And the canvas will no longer be a list of lines, but a list of objects that implement the IDrawable interface:
public class Canvas : List<IDrawable>
{
// [...]For the arc, first, let’s understand how the Turtle draws it. It starts on the point ahead of the turtle head, adding the amount specified by the arc radius. Then, the arc length will be controlled by another parameter, that is the arc angle. The arc will be drawn counterclockwise.
namespace Logo2Svg.SVG;

public class Arc : IDrawable
{
    private readonly Point _center;
    private readonly Colour _colour;
    private readonly float _facing;
    private readonly float _radius;
    private readonly float _angle;

    public Arc(Point center, float facing, float radius, float angle, Colour colour)
    {
        _center = center;
        _facing = facing;
        _radius = radius;
        _angle = angle;
        _colour = colour;
    }

    private string ComputePoint(float angle)
        => $"{_center.X + MathF.Cos(angle) * _radius} {_center.Y - MathF.Sin(angle) * _radius}";

    public override string ToString()
    {
        var path = ComputePoint(_facing);
        for (var alpha = _facing; alpha > _facing - _angle; alpha -= Turtle.ToRadians)
        {
            path += $" L {ComputePoint(alpha)}";
        }
        return @$"<path fill=""none"" style=""stroke:{_colour}"" d=""M {path}""/>";
    }
}Unfortunately explaining the way the SVG is generated goes beyond the scope of this tutorial. If you want more information please follow the link I shared at the beginning of this post.
Just like we have one method to add a line to the canvas it will be handy to have one for arcs too:
  public void AddArc(Point turtlePosition, float turtleAngle, float radius, float angle)
  {
      _canvas.Add(new Arc(turtlePosition, turtleAngle, radius, angle, Colour));
}Before we start editing the command behaviours, we need two small changes in the turtle to accomplish the implementation of the Home command. This command resets the position and orientation of the turtle to its original values.
    public void Reset()
    {
        Position = new Point(100, 100);
        Rotation = MathF.PI / 2f;
}And now take advantage of this method in the constructor, and remove the hardcoded initialization of the position and rotation.
// [...]
public Point Position;
// [...]
private float _rotation;
// [...]
public Turtle()
{
    Reset();
}This should be enough to allow us to dive into the command implementation. This will be done by adding more options to the switch block in the Command.cs class. To make things more concise I will share one block at a time. Just be sure to add it in the switch, before the default clause.
      switch (Id) {
          // [....]
          case LogoLexer.Back:
          {
              var value = Parameter<ValueParam>(0).Value;
              var pos = turtle.Position;
              var target = new Point(pos.X - MathF.Cos(turtle.Rotation) * value,
                  pos.Y + MathF.Sin(turtle.Rotation) * value);
              turtle.AddLine(pos, target);
              turtle.Position = target;
              break;
          }
          case LogoLexer.Left:
          {
              var value = Parameter<ValueParam>(0).Value;
              turtle.Rotation += value * Turtle.ToRadians;
              break;
}These two are just the inverse of the forward and right commands. Replacing the minus sign with a plus sign is enough to accomplish our goals.
      switch (Id) {
          // [....]
          case LogoLexer.Home:
              turtle.Reset();
              break;
          case LogoLexer.SetXY:
          case LogoLexer.SetPos:
              turtle.Position = Parameter<PointParam>(0).Point;
              break;
Note that we still do not have a way to create a Point from a PointParam. We’ll implement that shortly. Also, the SetXY and SetPos commands are similar, but the syntax is different. Thus, we can take advantage of that, and not repeat the code.
    switch (Id) {
        // [....]
        case LogoLexer.SetX:
            turtle.Position.X = Parameter<ValueParam>(0).Value;
            break;
        case LogoLexer.SetY:
            turtle.Position.Y = Parameter<ValueParam>(0).Value;
            break;
        case LogoLexer.SetH:
            turtle.Rotation = Parameter<ValueParam>(0).Value;
break;These just set the X, Y or heading of the turtle.
 switch (Id) {
      // [....]
      case LogoLexer.Arc:
      {
          var angle = Parameter<ValueParam>(0).Value * Turtle.ToRadians;
          var radius = Parameter<ValueParam>(1).Value;
          turtle.AddArc(turtle.Position, turtle.Rotation, radius, angle);
          break;
}And finally for the arc. Just be sure to convert the angle from degrees to radians, and add the arc to the turtle.
Just the conversion from PointParam to Param is missing:
public Point Point => new Point(X.Value, Y.Value);Testing
To test, I suggest you play with these commands in the web playground and repeat the commands in our tool. In any case, I leave here a small sample for testing purposes.
fd 10
arc 90 90
rt 90
fd 10
arc 90 90
rt 90
fd 10
arc 90 90
rt 90
fd 10
arc 90 90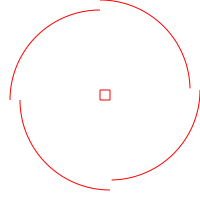
“Yes, that is correct, in computer science trees have the root at the top.” 😁😁😁